Title, NarrativeText, UncategorizedText, Table, Image, List, and so on. For example, you could have
Unstructured ingest a stack of customer order forms in PDF format, where the PDF files’ layout is identical, but the
content differs per individual PDF by customer order number. For each PDF, Unstructured might output elements such as
a List element that contains details about the customer who placed the order, a Table element
that contains the customer’s order details, NarrativeText or UncategorizedText elements that contains special
instructions for the order, and so on. You might then use custom logic that you write yourself to parse those elements further in an attempt to
extract information that you’re particularly interested in, such as customer IDs, item quantities, order totals, and so on.
Unstructured’s structured data extractor simplifies this kind of scenario by allowing Unstructured to automatically extract the data from your source documents
into a format that you define up front. For example, you could have Unstructured ingest that same stack of customer order form PDFs and
then output a series of customer records, one record per order form. Each record could include data, with associated field labels, such as the customer’s ID; a series of order line items with descriptions, quantities, and prices;
the order’s total amount; and any other available details that matter to you.
This information is extracted in a consistent JSON format that is already fine-tuned for you to use in your own applications.
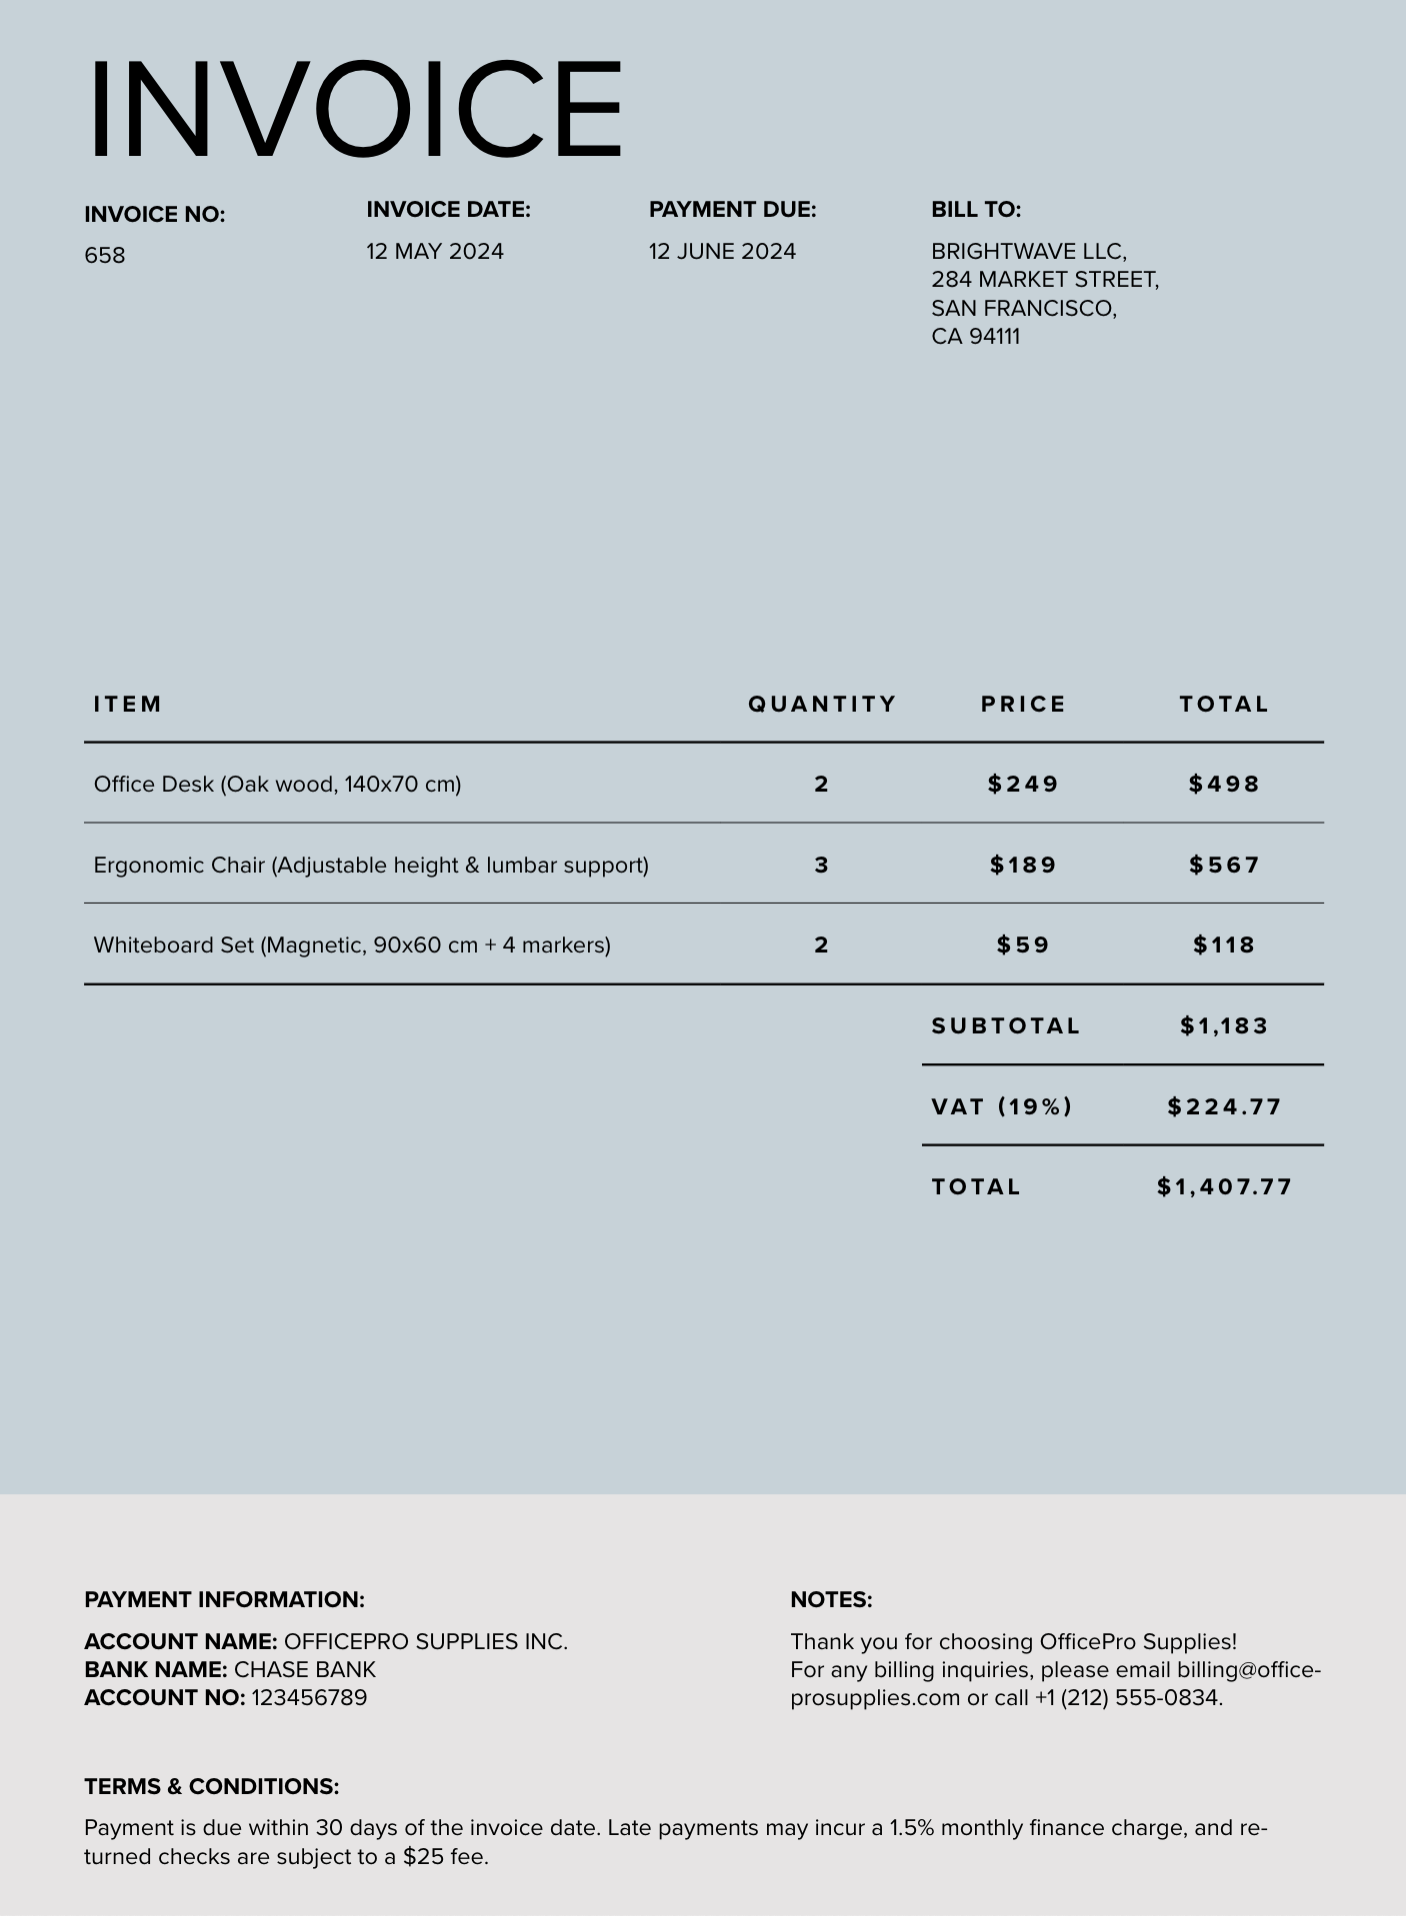
To show how the structured data extractor works, take a look at the following sample sales invoice PDF. This file is one of the
sample files that is available directly from the Start page and the workflow editor in the Unstructured use interface (UI). The file’s
content is as follows:

text fields for the Table elements contain the raw text of the table, and the text_as_html field contains corresponding HTML representations of the table. However,
you might also want the table’s information output as an invoice field with, among other details, each of the invoice’s line items having a description, quantity, price, and total field.
However, neither the default Unstructured text nor table_as_html fields present the tables in this way by default.
By using the structured data extractor in your Unstructured workflows, you could have Unstructured extract the invoice’s data in a custom-defined output format similar to the following (ellipses indicate omitted fields for brevity):
DocumentData, has an extracted_data field within metadata
that contains a representation of the document’s data in the custom output format that you specify. Beginning with the second document element and continuing
until the end of the document, Unstructured also outputs the document’s data as a series of Unstructured’s document elements and metadata as it normally would.
To use the structured data extractor, you must provide Unstructured with an extraction schema, which defines the structure of the data for Unstructured to extract.
You can provide this schema by specifying an extraction prompt, by providing a JSON object, or by using a visual schema builder.
An extraction prompt is like a prompt that you would give to a chatbot or AI agent. This prompt guides Unstructured on how to extract the data from the source documents. For this invoice example, the
prompt might look like the following:
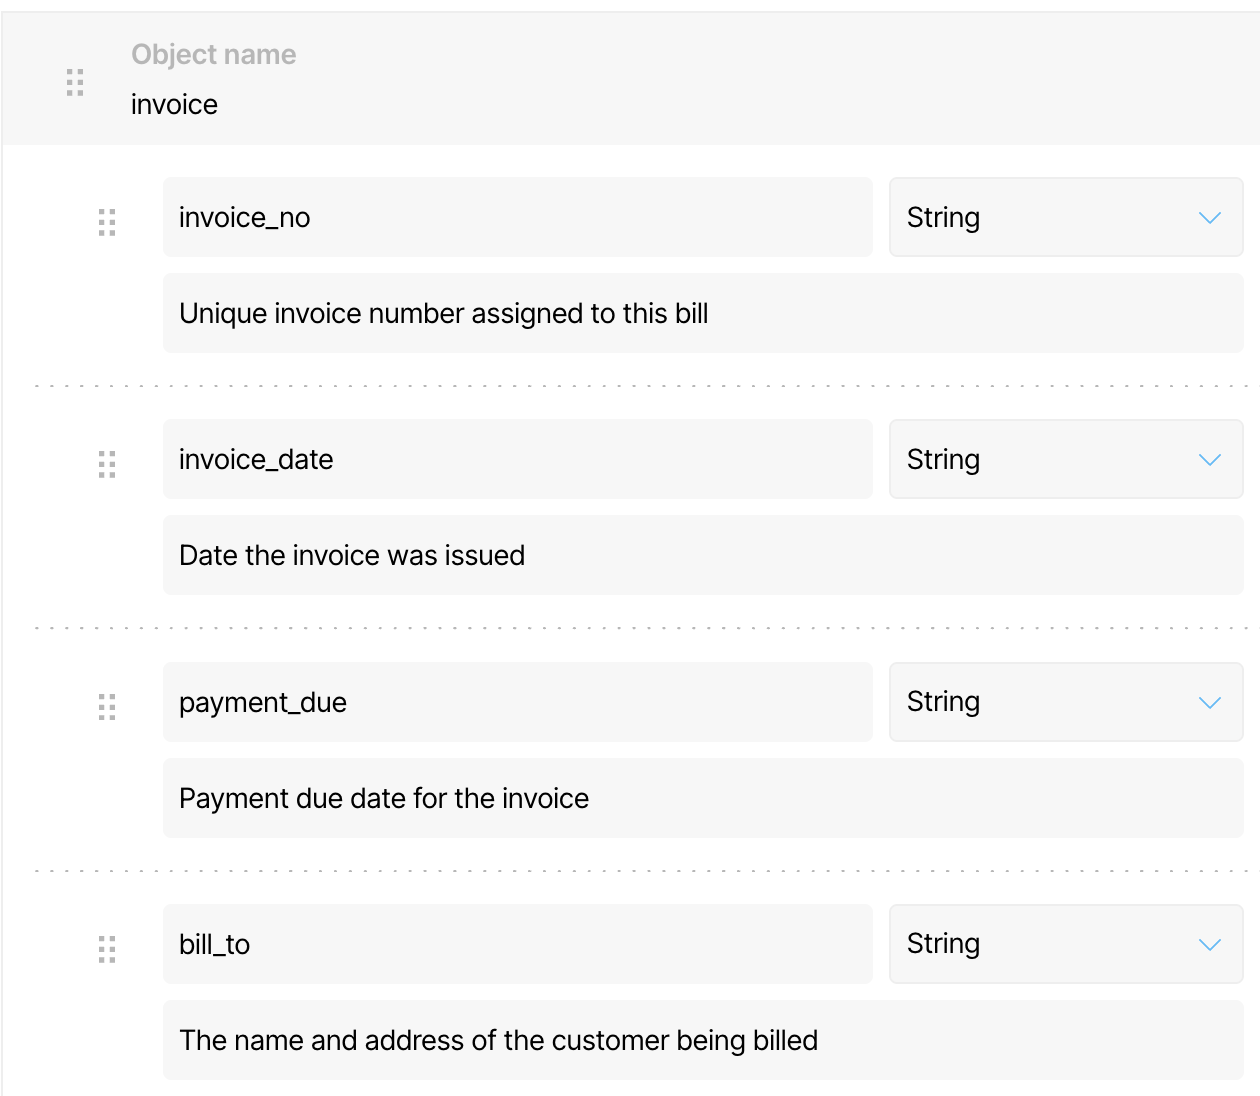
- The top-level
invoiceobject contains nested strings, arrays, and objects such asinvoice_no,invoice_date,payment_due,bill_to,payment_information,terms_conditions,notes,items,subtotal,vat, andtotal. - The nested
payment_informationobject contains nested strings such asaccount_name,bank_name, andaccount_no. - The nested
itemsarray contains a series of strings, integers, and numbers such asdescription,quantity,price, andtotal.

Using the structured data extractor
There are two ways to use the structured data extractor in your Unstructured workflows:- From the Welcome, get started right away! tile on the Start page of your Unstructured account. This approach works only with a single file that is stored on your local machine. Learn how.
- From the Unstructured workflow editor. This approach works with a single file that is stored on your local machine, or with any number of files that are stored in remote locations. Learn how.
Use the structured data extractor from the Start page
- Sign in to your Unstructured account, if you are not already signed in.
- On the sidebar, click Start, if the Start page is not already showing.
-
In the Welcome, get started right away! tile, do one of the following:
-
To use a file on your local machine, click Browse files and then select the file, or drag and drop the file onto Drop file to test.
If you use a local file, the file must be 10 MB or less in size.
- To use a sample file provided by Unstructured, click one of the the sample files that are shown, such as realestate.pdf.
-
To use a file on your local machine, click Browse files and then select the file, or drag and drop the file onto Drop file to test.
- After Unstructured partitions the selected file into Unstructured’s document element format, click Update results to have Unstructured apply generative enrichments, such as image descriptions and generative OCR, to those document elements.
- In the title bar, next to Transform, click Extract.
-
If the Define Schema pane, do one of the following to extract the data from the selected file by using a custom-defined format:
- To use the schema based on one that Unstructured suggests after analyzing the selected files, click the JSON tab, make any changes to the suggestedschema as needed, and then click Run Schema.
- To use a custom schema that conforms to the OpenAI Structured Outputs guidelines, click the JSON tab, enter your own custom schema, and then click Run Schema.
- To use a visual editor to define the schema, click the List tab, enter your own custom schema objects and their properties, and then click Run Schema.
- To use a plain language prompt to guide Unstructured on how to extract the data, click Prompt, enter your propmpt in the dialog, and then click Generate schema. Unstructured will then suggest a schema on the JSON tab. Make any changes to the suggested schema as needed, and then click Run Schema.
-
The extracted data appears in the Extract results pane. You can do one of the following:
- To view a human-viewable representation of the extracted data, click Formatted.
- To view the JSON representation of the extracted data, click JSON.
- To download the JSON representation of the extracted data as a local JSON file, click the download icon next to Formatted and JSON.
- To change the schema and then re-run the extraction, click the back arrow next to Extract results, and then skip back to step 6 in this procedure.
Use the structured data extractor from the workflow editor
-
If you already have an Unstructured workflow that you want to use, open it to show the workflow editor. Otherwise, create a new
workflow as follows:
a. Sign in to your Unstructured account, if you are not already signed in.
b. On the sidebar, click Workflows.
c. Click New Workflow +.
d. With Build it Myself already selected, click Continue. The workflow editor appears.
- Add a Structured Data Extractor node to your existing Unstructured workflow. This node must be added immediately after the Partitioner node in the workflow. To add this node, in the workflow designer, click the + (add node) button, click Transform, and then click Structured Data Extractor.
- Click the newly added Structured Data Extractor node to select it.
- …
-
In the node’s settings pane, on the Details tab, specify the following:
a. For Extraction Guidance Prompt, enter the text of your extraction guidance prompt.
b. Click Edit Code, enter the text of your extraction schema, and then click Save Changes. The text you entered will appear in the Schema box.
- Continue building your workflow as desired.
-
To see the results of the structured data extractor, do one of the following:
- If you are using a local file as input to your workflow, click Test immediately above the Source node. The results will be displayed on-screen in the Test output pane.
- If you are using source and destination connectors for your workflow, run the workflow, monitor the workflow’s job, and then examine the results in your destination location.
Limitations
The structured data extractor does not work with the Pinecone destination connector. This is because Pinecone has strict limit on the amount of metadata that it can manage. These limits are below the threshold of what the structured data extractor typically needs for the amount of metadata that it manages.Saving the extracted data separately
There might be cases where you want to save the contents of theextracted_data field separately from the rest of Unstructured’s JSON output.
To do this, you could use a Python script such as the following. This script works with one or more Unstructured JSON output files that you already have stored
on the same machine as this script. Before you run this script, do the following:
-
To process all Unstructured JSON files within a directory, change
Noneforinput_dirto a string that contains the path to the directory. This can be a relative or absolute path. -
To process specific Unstructured JSON files within a directory or across multiple directories, change
Noneforinput_fileto a string that contains a comma-separated list of filepaths on your local machine, for example"./input/2507.13305v1.pdf.json,./input2/table-multi-row-column-cells.pdf.json". These filepaths can be relative or absolute.Ifinput_dirandinput_fileare both set to something other thanNone, then theinput_dirsetting takes precedence, and theinput_filesetting is ignored. -
For the
output_dirparameter, specify a string that contains the path to the directory on your local machine that you want to send theextracted_dataJSON. If the specified directory does not exist at that location, the code will create the missing directory for you. This path can be relative or absolute.
Additional examples
In addition to the preceding invoice example, here are some more examples that you can adapt for your own use.Caring for houseplants
Using the following image file:
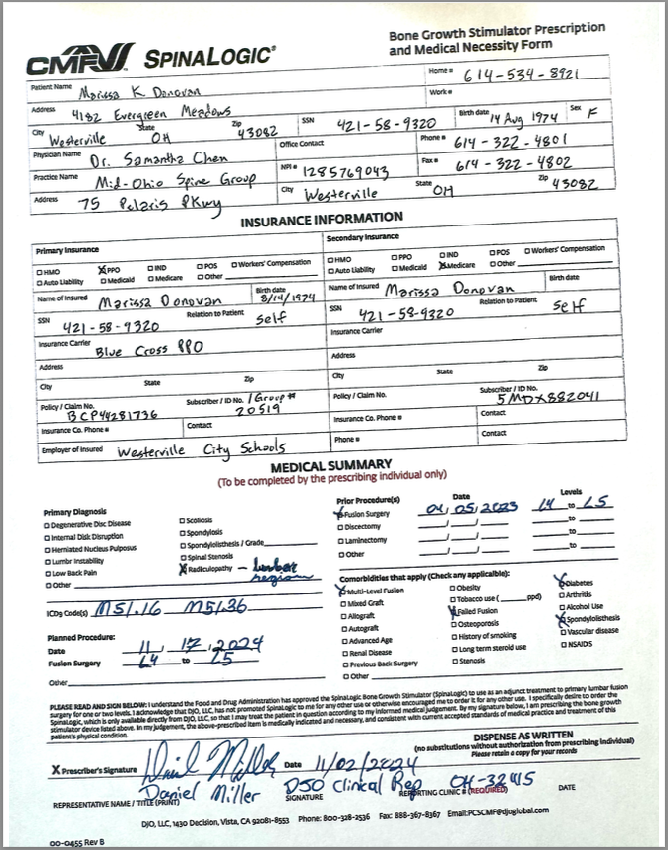
Medical invoicing
Using the following PDF file:

